
As humans, we’ve always innovated our way out of problems, whether it was the first torch to light a dark cave or the steam engine that sparked a revolution.
Frans van Houten
Just A Bit Of A Disclaimer
This blog is not intended for training anybody, it’s just a description of what this stuff involves and how it works I am not qualified to instruct people (well in this at least) yet. If you would like to learn the techniques described (very roughly!) in this article correctly please be sensible and get yourself an instructor and / or join a caving club. Caving and SRT are extremely dangerous if you have not been trained, plus If you are going to be hanging out on a rope deep underground into the darkness you want to be doing it with some confidence at least, as unless you have something wrong with your amygdala (that’s the bit of the brain that causes fear and anxiety) the first time you step over the edge into that abyss as a newbie… it is terrifying. The point of this blog is purely to describe the experience of SRT training and to describe what you can expect if you want to learn this yourself.
Top Tip: Caving Clubs
Joining a caving club will give you access to people with lots of experience, insurance and most importantly much cheaper training courses to learn skills like SRT. Plus knowing what you are doing and / or heading out with others who know what they are doing will hopefully greatly reduce your chances of getting your ass rescued from a cave or mine, which I can imagine is not a good time.
In The Brecon Beacons
It’s day two of being in Brecon after having a short walking trip down Porth Yr Ogof cave yesterday which you can read about by clicking HERE. I’m dropping my mate off so he can go for a hike and meet me later for another hike because neither of us have any chill. I’ve got some of my freshly bought and shiny SRT gear packed and I’m a little bit nervous as this is a brand new thing for me. I want to extend my scope of adventures though so as far as I’m concerned it is unavoidable. Luckily I’m also really excited about the whole thing too, I mean who wouldn’t want to abseil down things and shimmy up ropes down into pitch black underground holes. Thinking about it probably quite a lot of people but I’m clearly not one of them.
Right So What The Hell IS SRT
As mentioned earlier SRT (or single rope technique) is a method that uses one static or semi-static rope to ascend, descend and traverse vertical ‘pitches’ in caves or in other environments. Static rope has little stretch to it and as you can guess semi static has some stretch to it the benefit of semi static rope being that if you fall on it the stretch absorbs some of the shock of the fall. A pitch is a section of the cave route that needs to be ascended/descended using ladders or SRT as it is too unsafe to climb up or down otherwise .The top of the pitch is referred to as the pitch ‘head’ the bottom the pitch ‘base’ and a pitch is referred to as an ‘Aven’ if approached from below.
Llangorse Multi Activity Centre
Today myself and the other people who want to learn how to lower themselves in and out of holes in the floor are at the Llangorse Multi activity centre, which has a large climbing area in it lots of things to abseil off. It’s the only one I’ve seen that has a huge feature, like a mini canyon in the middle made out of actual rock and boulders, it must have been an effort building this place. We meet our instructors in the cafe and we all make our introductions which is easy enough when you are all outdoorsy people. They ask us what we are all looking to get out of the session, to which I’m pretty straightforward, I want the skill as I’d like to be able to explore more things, more sketchy places.
Heading to the kit up area I’m lending a harness chest harness cowtails, foot loop and chest ascender as frustratingly I have ordered a chest harness a waist harness and a Croll that haven’t arrived yet. And at that exact moment I’m thinking this I get a message saying it’s been delivered. To the house In Birmingham FFS. Putting these harnesses on I can’t help feeling like I’m cosplaying as one of the beastie boys.
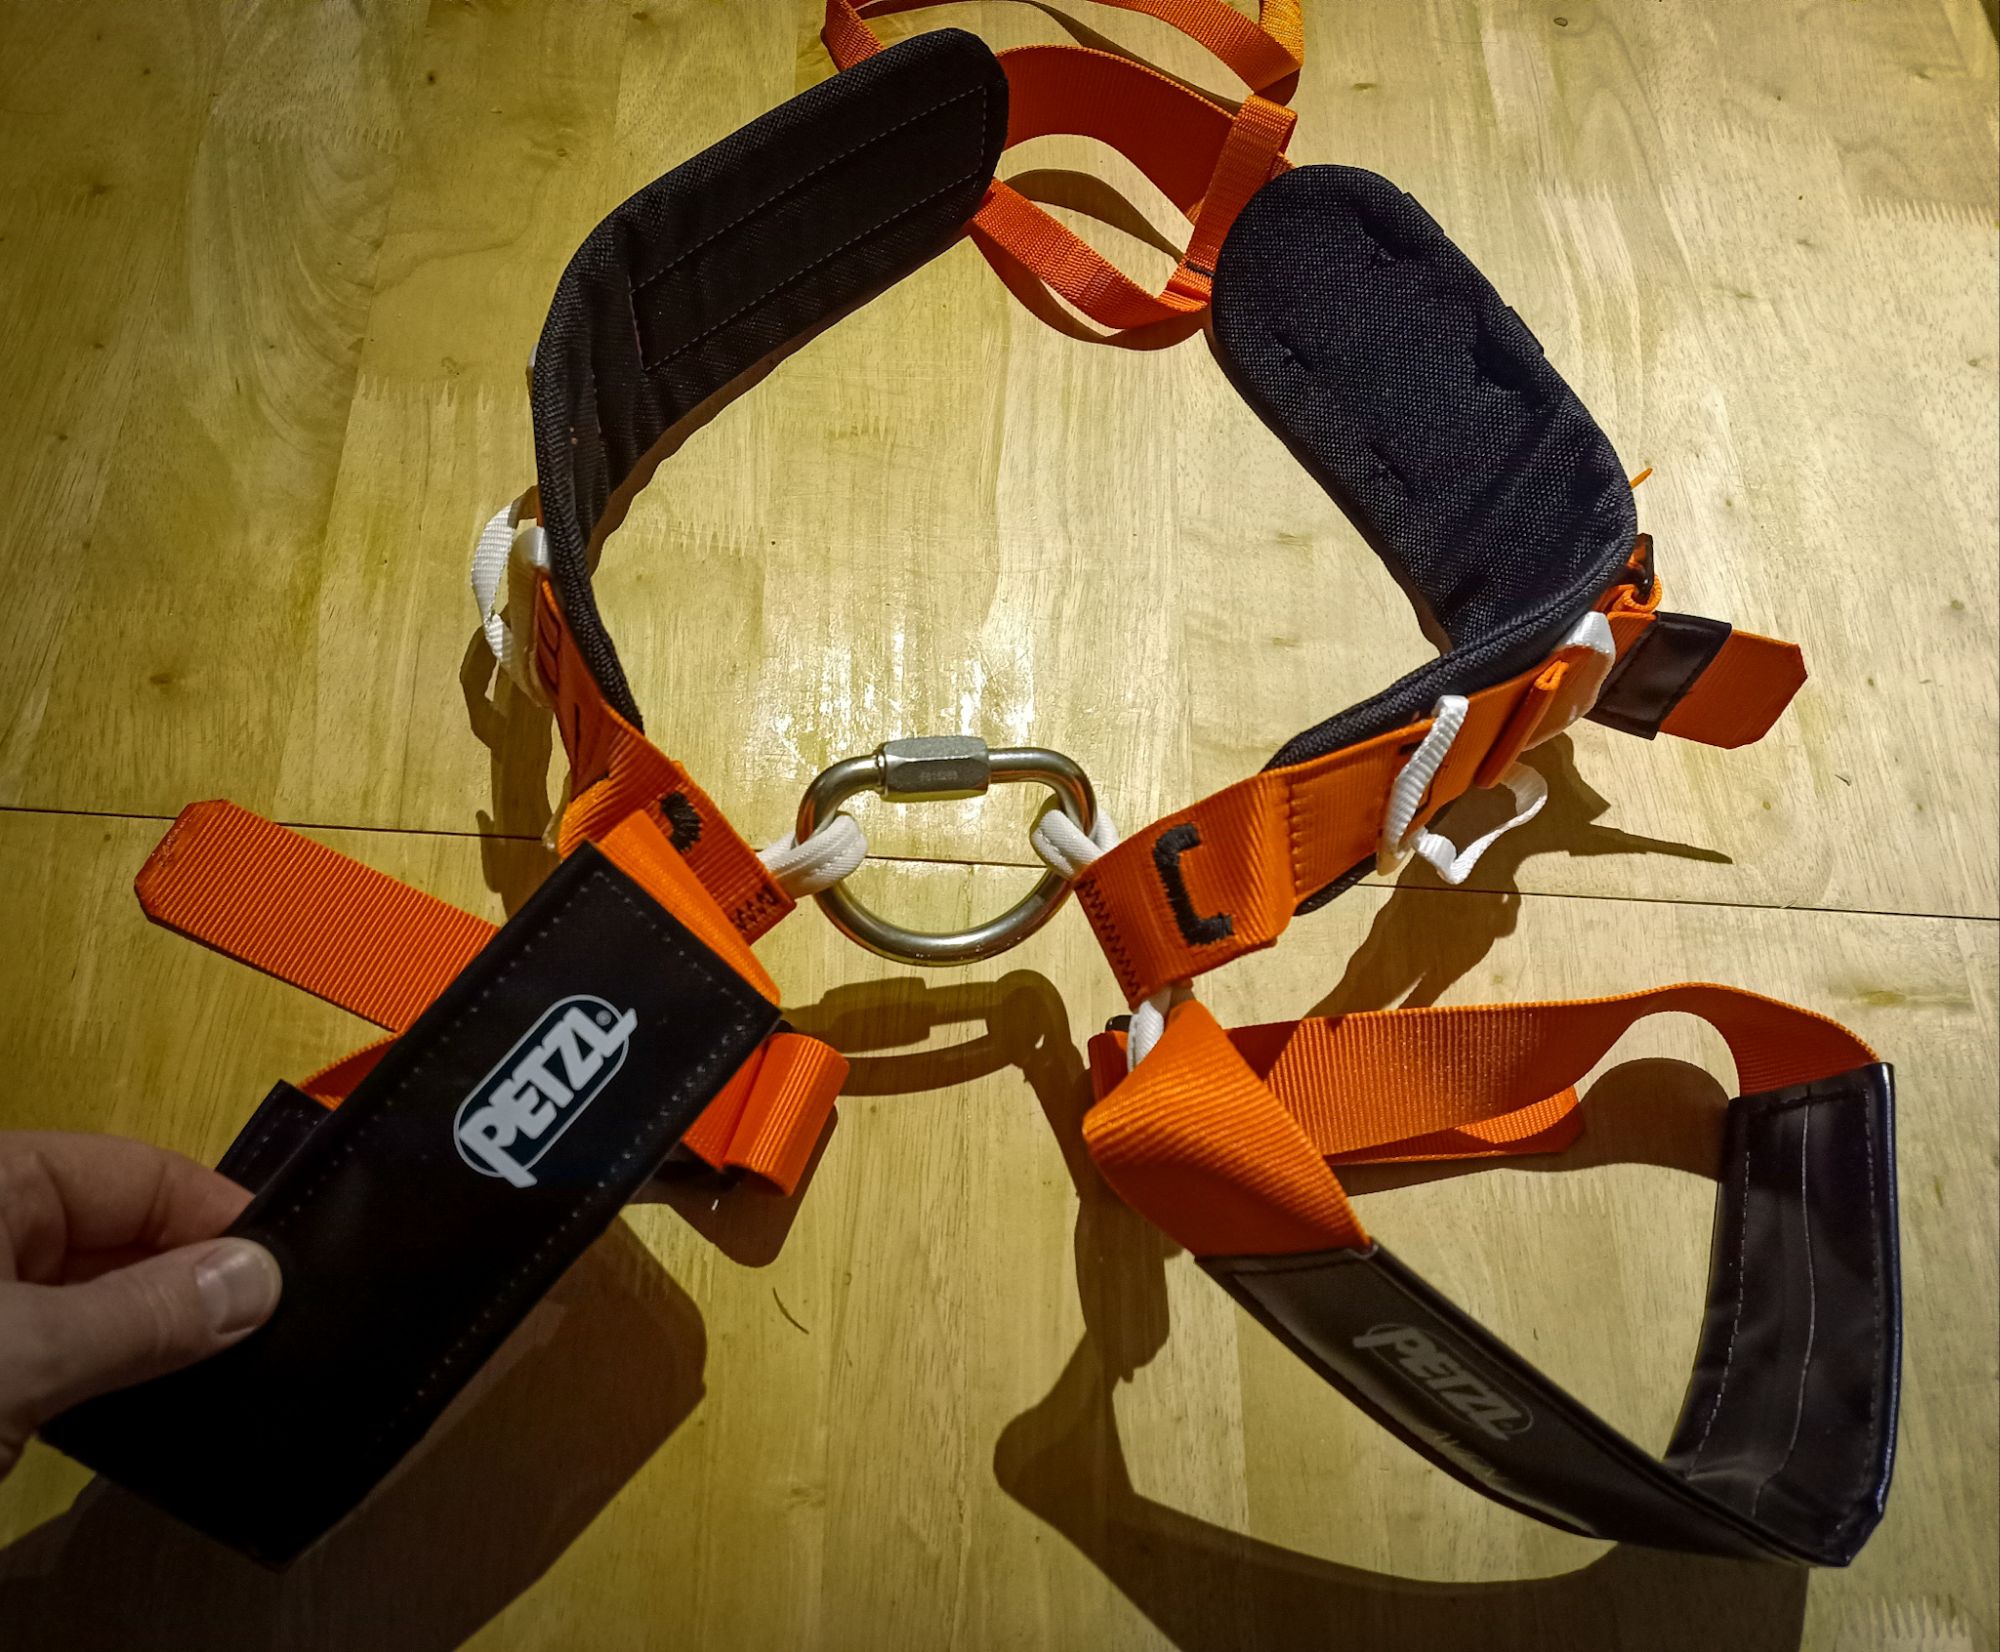
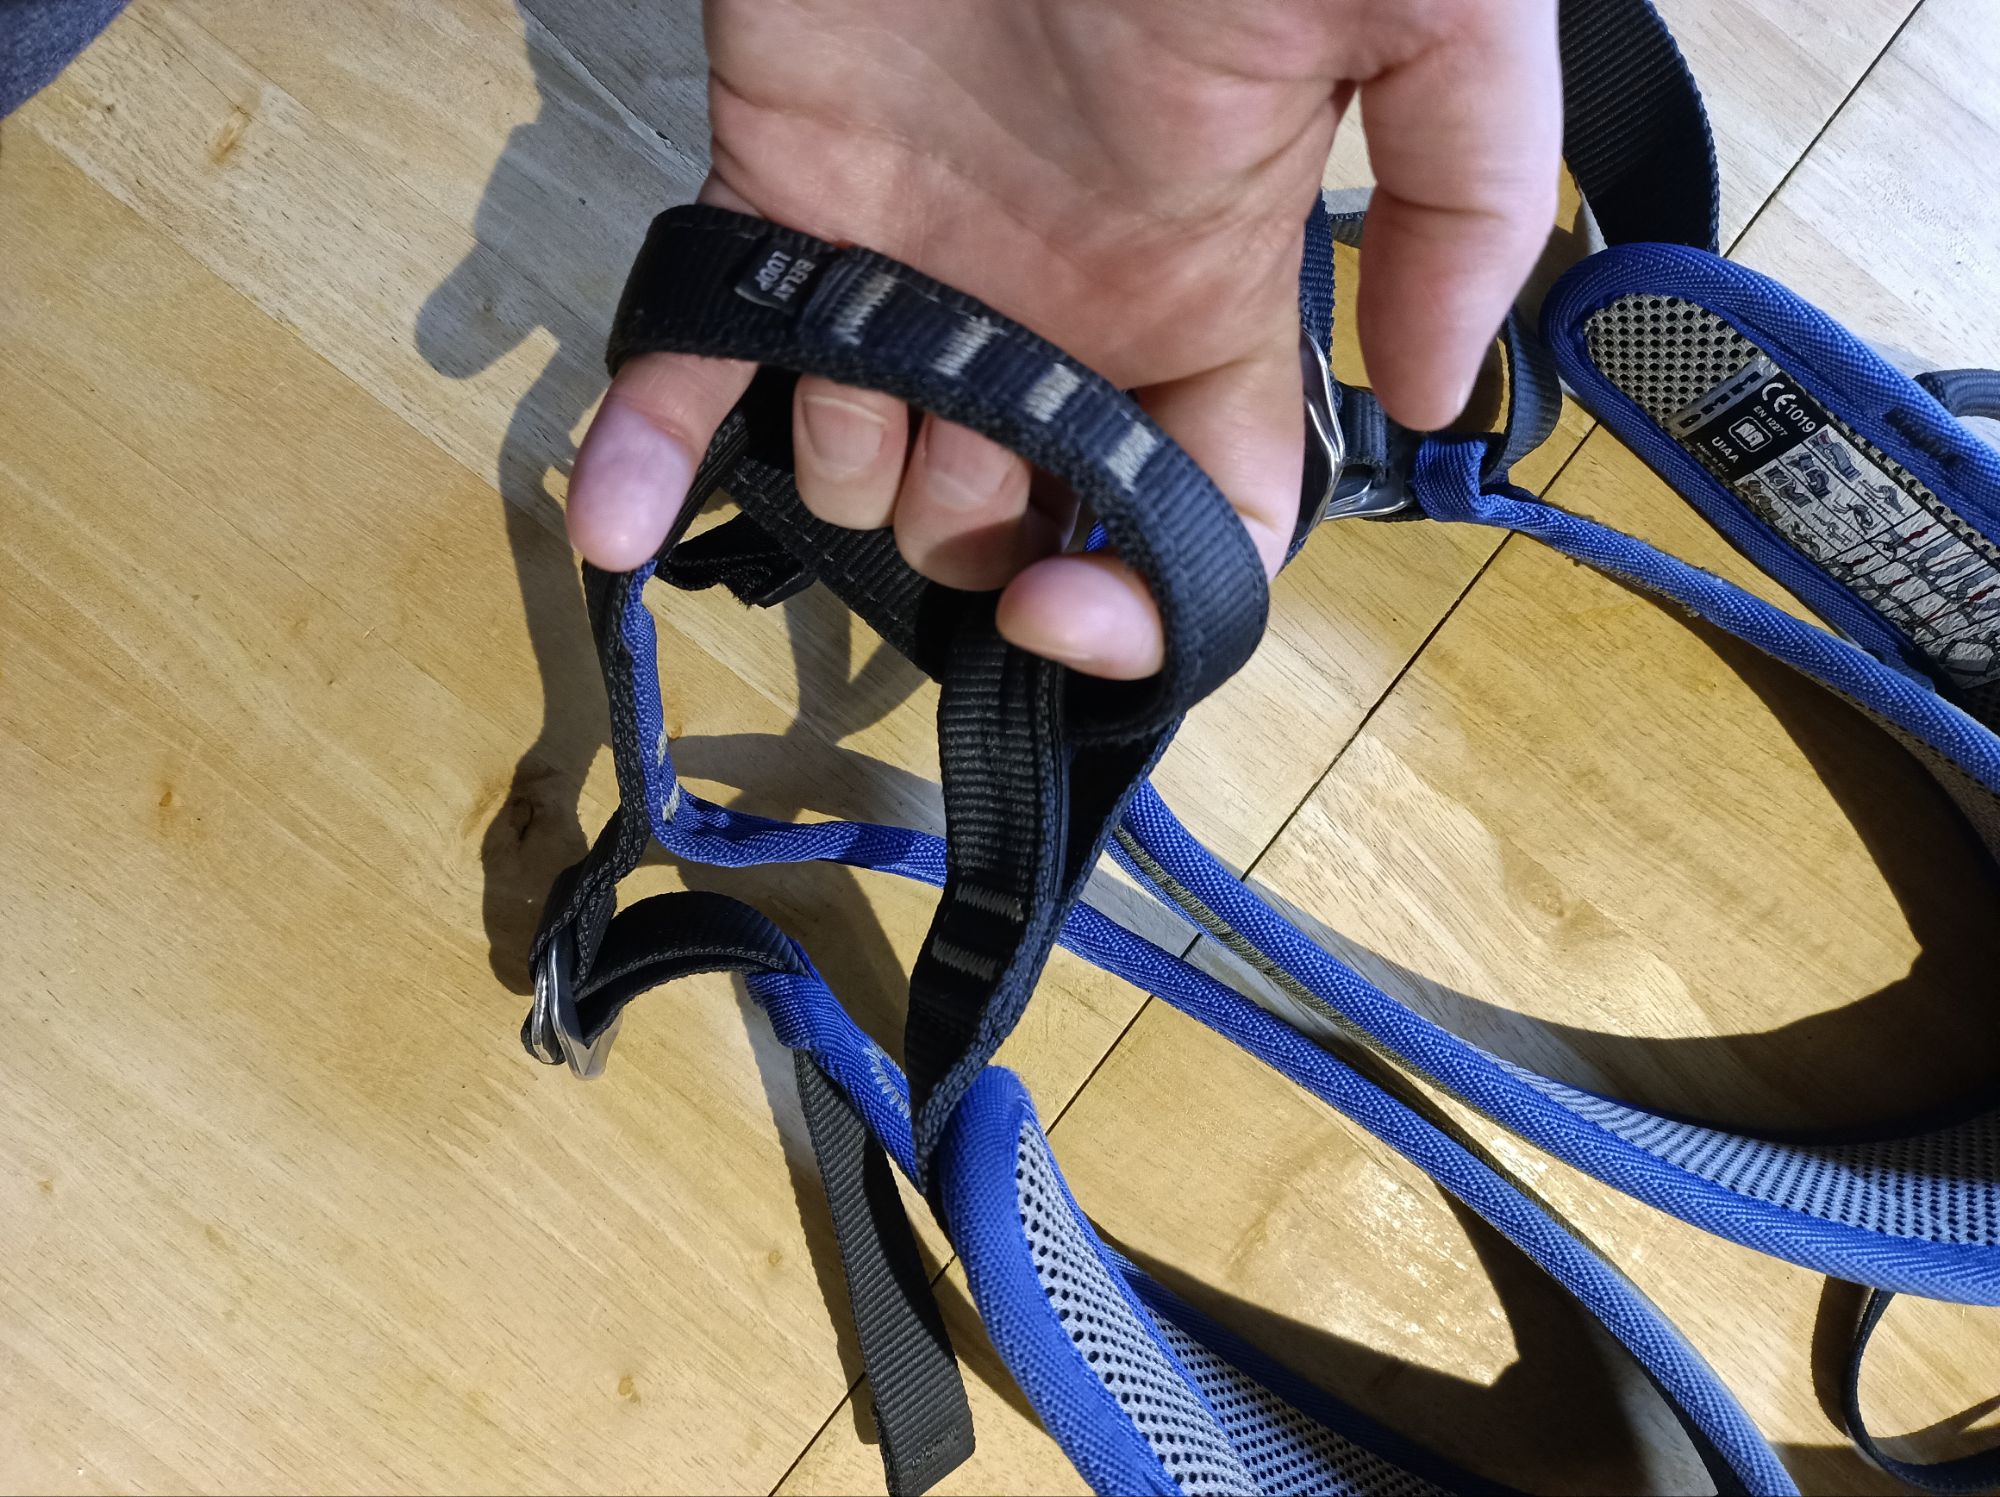
Harnesses
There’s quite a few harnesses for outdoor activities however as with most things in the outdoor pursuits world there’s never a one size fits all approach. For example there’s a marked difference between a climbing harness and a caving harness. The caving hip harness is worn looser and isn’t pulled up over the hips, additionally instead of the sort of fabric belay loop and tie in loops you get on a climbing harness you have a half moon shaped mallion rapide or a D-ring carabiner. A mallion rapide (quick link) is a very heavy duty mechanical connector made of a rod and a nut and while they are not as easy to use as a carabiner they are much cheaper and stronger. The design of caving harnesses tends to be much more basic than a climbing harness, with less padding and the harness itself is made out of abrasion resistant materials. In the picture below you can can my Petzl Aven (orange) is clearly stripped back in comparison to the DMM Viper Climbing Harness, the attachment point also sits lower on a caving harness and allows better body positioning than a climbing harness due to this. That leads us to the likely question of can you use a climbing harness underground? Well yes you could but it’s probably best avoided.

Abseil Time
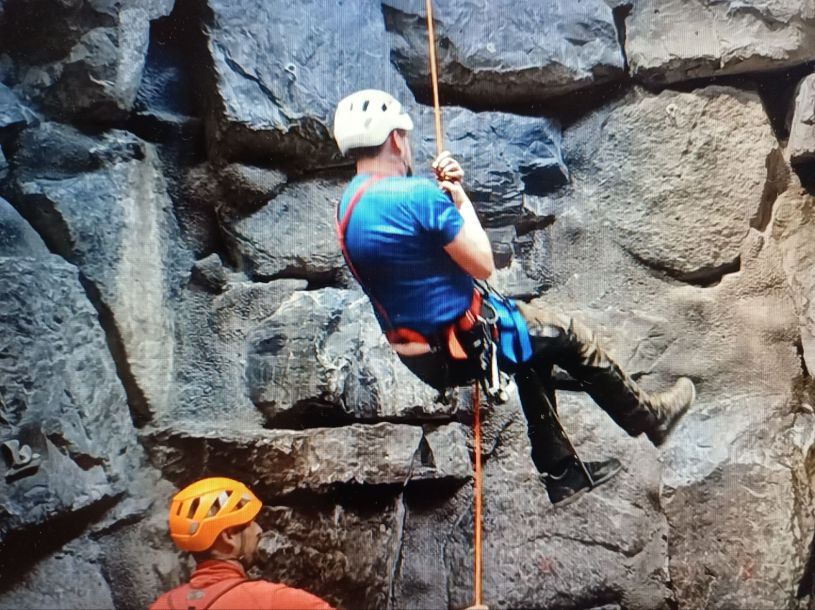
First up we are going to learn to abseil on the caving gear – there’s lots of forms of abseiling and this is something I have done before, though it is slightly different depending on your activity and setup. Having got kitted up we get ourselves up onto the abseil platform at the top of the centre to have a crack at some drills, the first thing we have to do though is make sure we are safe.
Making safe
One thing you just don’t do and I’m saying this now as I’m writing this blog as past tense as I’ve already used my SRT in a mine by this point, is that you you don’t just jog up to a pitch like you are in a run club, you make your way slowly just in case tripping over a pebble ends up on your gravestone. Not just this but some pitches can be slippy – many caves in the UK have mud and clay in them. To keep us safe when we are approaching a pitch there’s usually ropes attached to the cave or mine walls, which you clip your cowtails into with the gates facing you, attaching you to the rope and securing you in case you slip or fall. Realistically caves are some of the last places in the UK that have bene explored and more are being found all the time, however a lot of caves have already been explored and some gear put into them, so many but not all will have this setup on the approach to the pitch head which you can clip to as you approach the belay point.
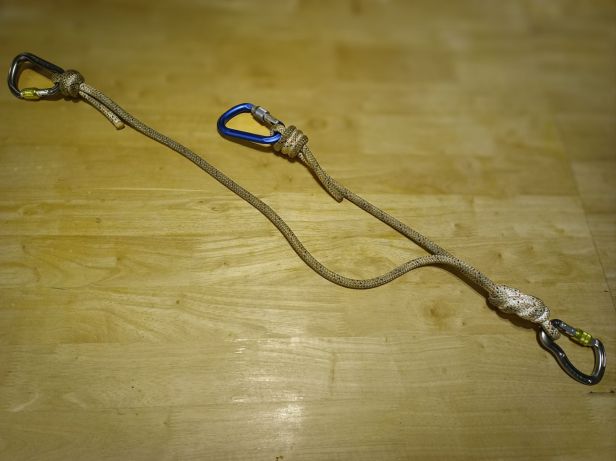
Ok Hold On What Are Cowtails Exactly
A nice simple bit of kit and something I was childishly proud of making my own set of – cowtails are a safety connection made from a length of dynamic (slightly stretchy) rope and a pair of carabiners. This clips onto your belay loop or in this case mallion on your harness. One of the lengths of rope is shorter, one longer and the reason why you use dynamic rope is because it absorbs shock. If you made these with static rope (that’s not stretchy) when you fall you’d get the full force and likely either at worse end up very uncomfortable or injure yourself.
I have to admit I’m a little apprehensive but I keep myself occupied filming the other chap Hywel clipping himself in and making sure I’ve got a record to look at, not just for the blog. You make yourself safe first using your cowtails which as mentioned previously are clipped onto the ropes approaching the belay point and then once you get there onto the belay point itself. To descend from here we are using various versions of a bit of kit called the Petzl Stop. This is what’s know as an ‘assisted braking descender’ device that’s very popular with cavers and designed for caving specifically. For additional friction a carabiner is used as a break in my case I’m using a Petzl Freino, a carabiner designed exactly for this purpose and specifically for the stop. ( See the current version of the Petzl stop below)
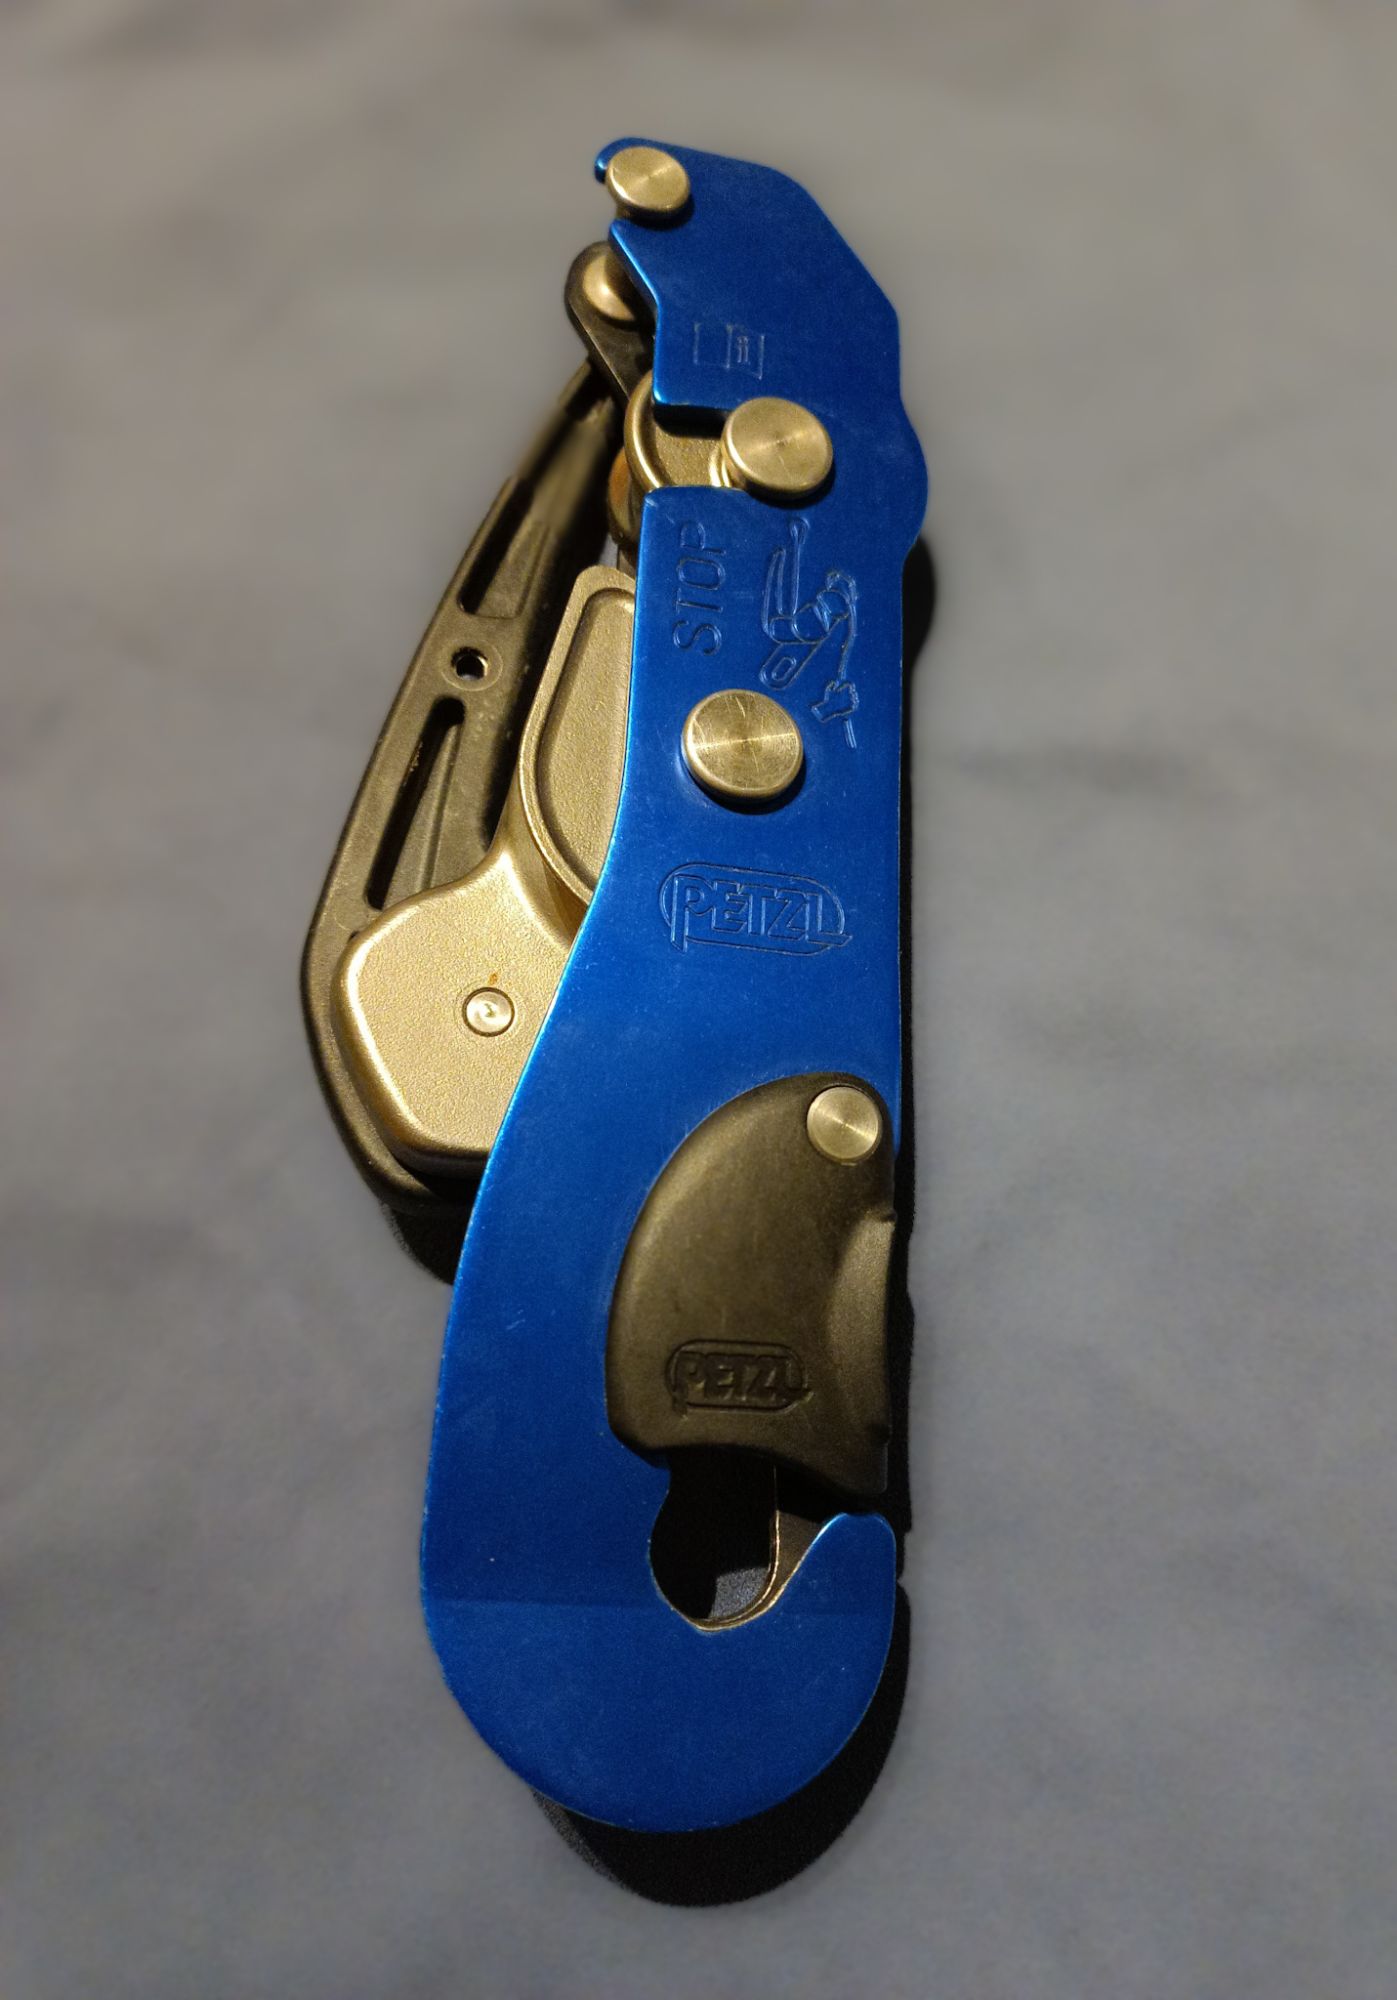
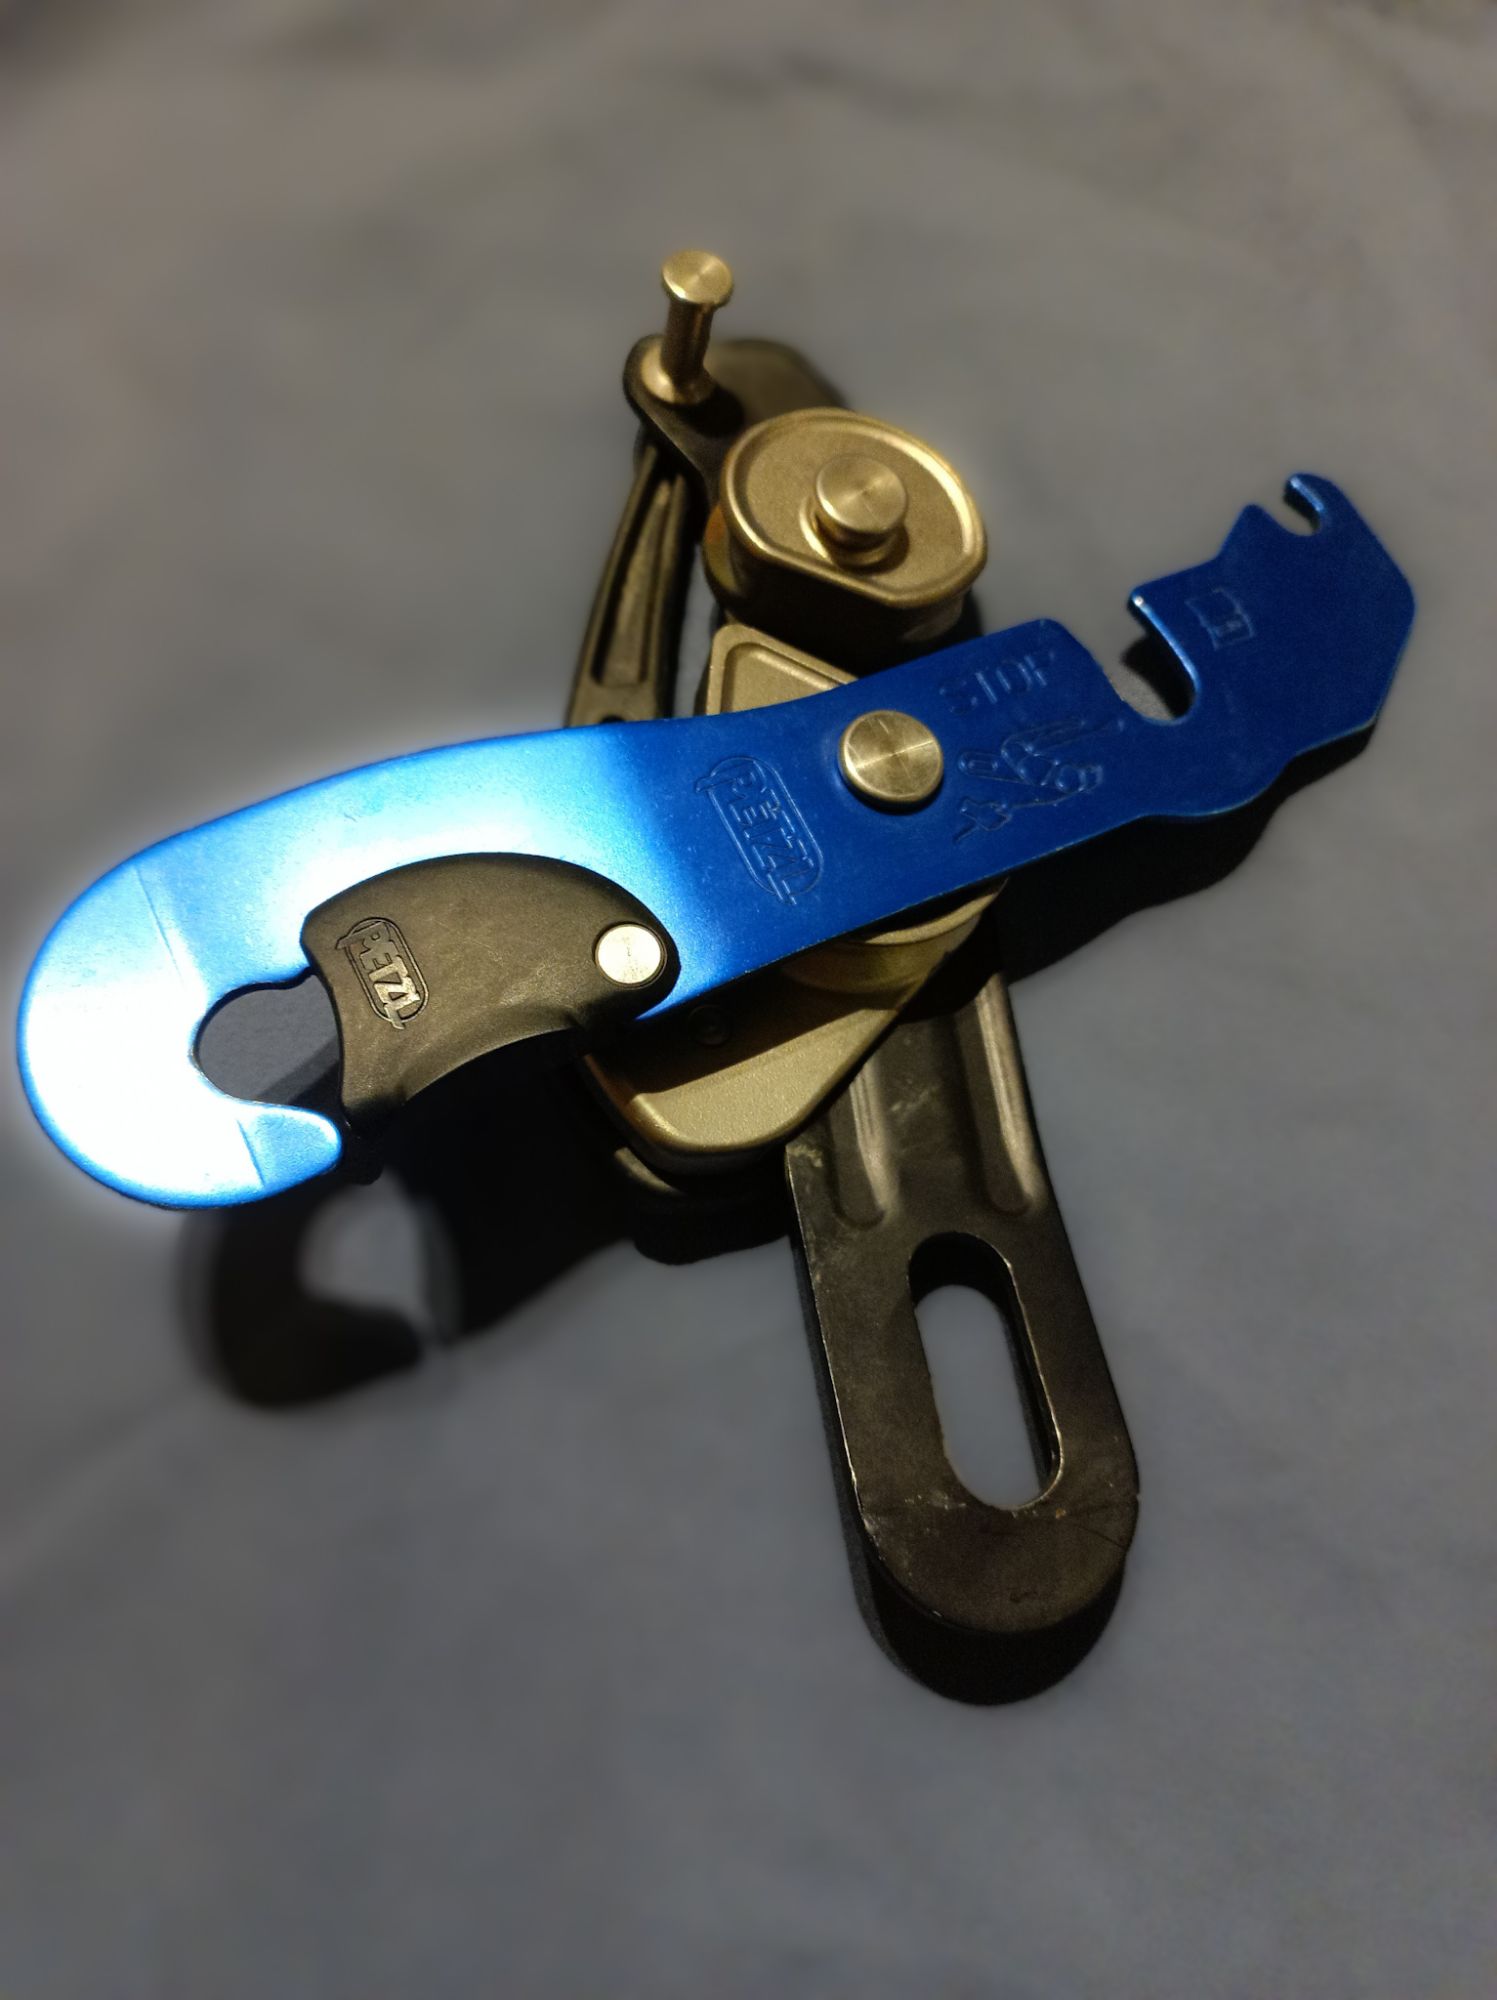
How the stop works is by putting friction onto the rope which allows you to control and slow your descent and gently lower yourself down an abseil by letting the rope through the device. It also has a very handy diagram on it to show you how the rope should go through, just in case it slips your mind or if you have a little panic, which if you are hanging over a pitch black hole in the floor, that you can’t see the bottom of is understandable. The handy diagram below from the stops manual should give you an idea of how it works.
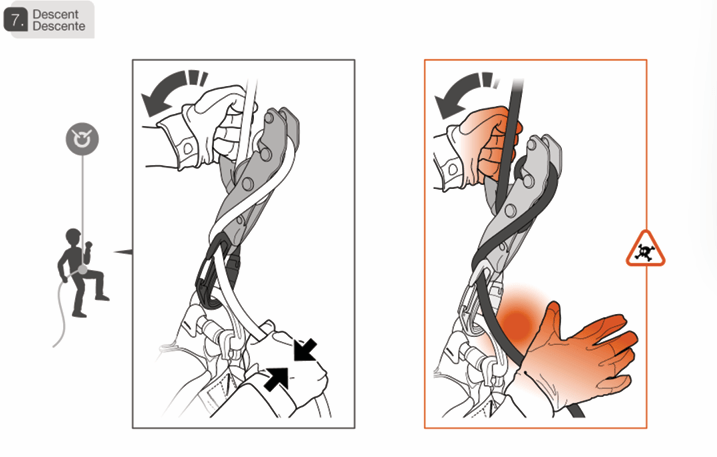
After threading our rope through the device we remove the slack on the rope pass the rope through our brake carabiner and then make ourselves safe by wrapping the rope around the stop descender. This ‘locking’ ourselves off enables us to hang and frees our hands. When you want to move, while locked off you remove your longer cow tail and then check your equipment is set up properly for the abseil and that the system is enabling you to move, then you lock off again and remove your cowtails, remove your lock off and descend. The descender provides enough friction to slowly and safely lower yourself to the floor. Of course you can see this being demonstrated on the video below.
It’s only a short drop down from the top, and I have abseiled before but I have to admit I have a childlike sense of achievement as I abseil down the small drop. I keep pretty calm considering my brains throwing intrusive thought images at me of me messing it up and hitting the floor like a wet fish. Over the years I’ve almost totally mastered ignoring these, which is a good thing! Still, there’s always a sense of relief when my feet touch the floor as I’ve got now – lowering myself down feels like a lot more could go wrong than it could when I’ve been climbing and lowered by a belayer. We all take a short break and then it’s onto the next thing – ascending a rope.
Going Up!
After a few practice descents we are now in the middle of the centre and I likely mentioned previously I’m liking this climbing centre as the area we are in now is made out of huge limestone (I think it’s limestone anyway) boulders. This makes this a bit more realistic, though it’s not dark and wet like a cave, I’m not complaining though because the usual deal of climbing up bits of caves in wellies isn’t exactly a cakewalk. It is way easier in my approach shoes, something I won’t be wearing during a caving trip unfortunately. Our instructor gets us together and explains how the equipment works, this time it’s the ascender device.
Ok Well What The Hell Is An Ascender?
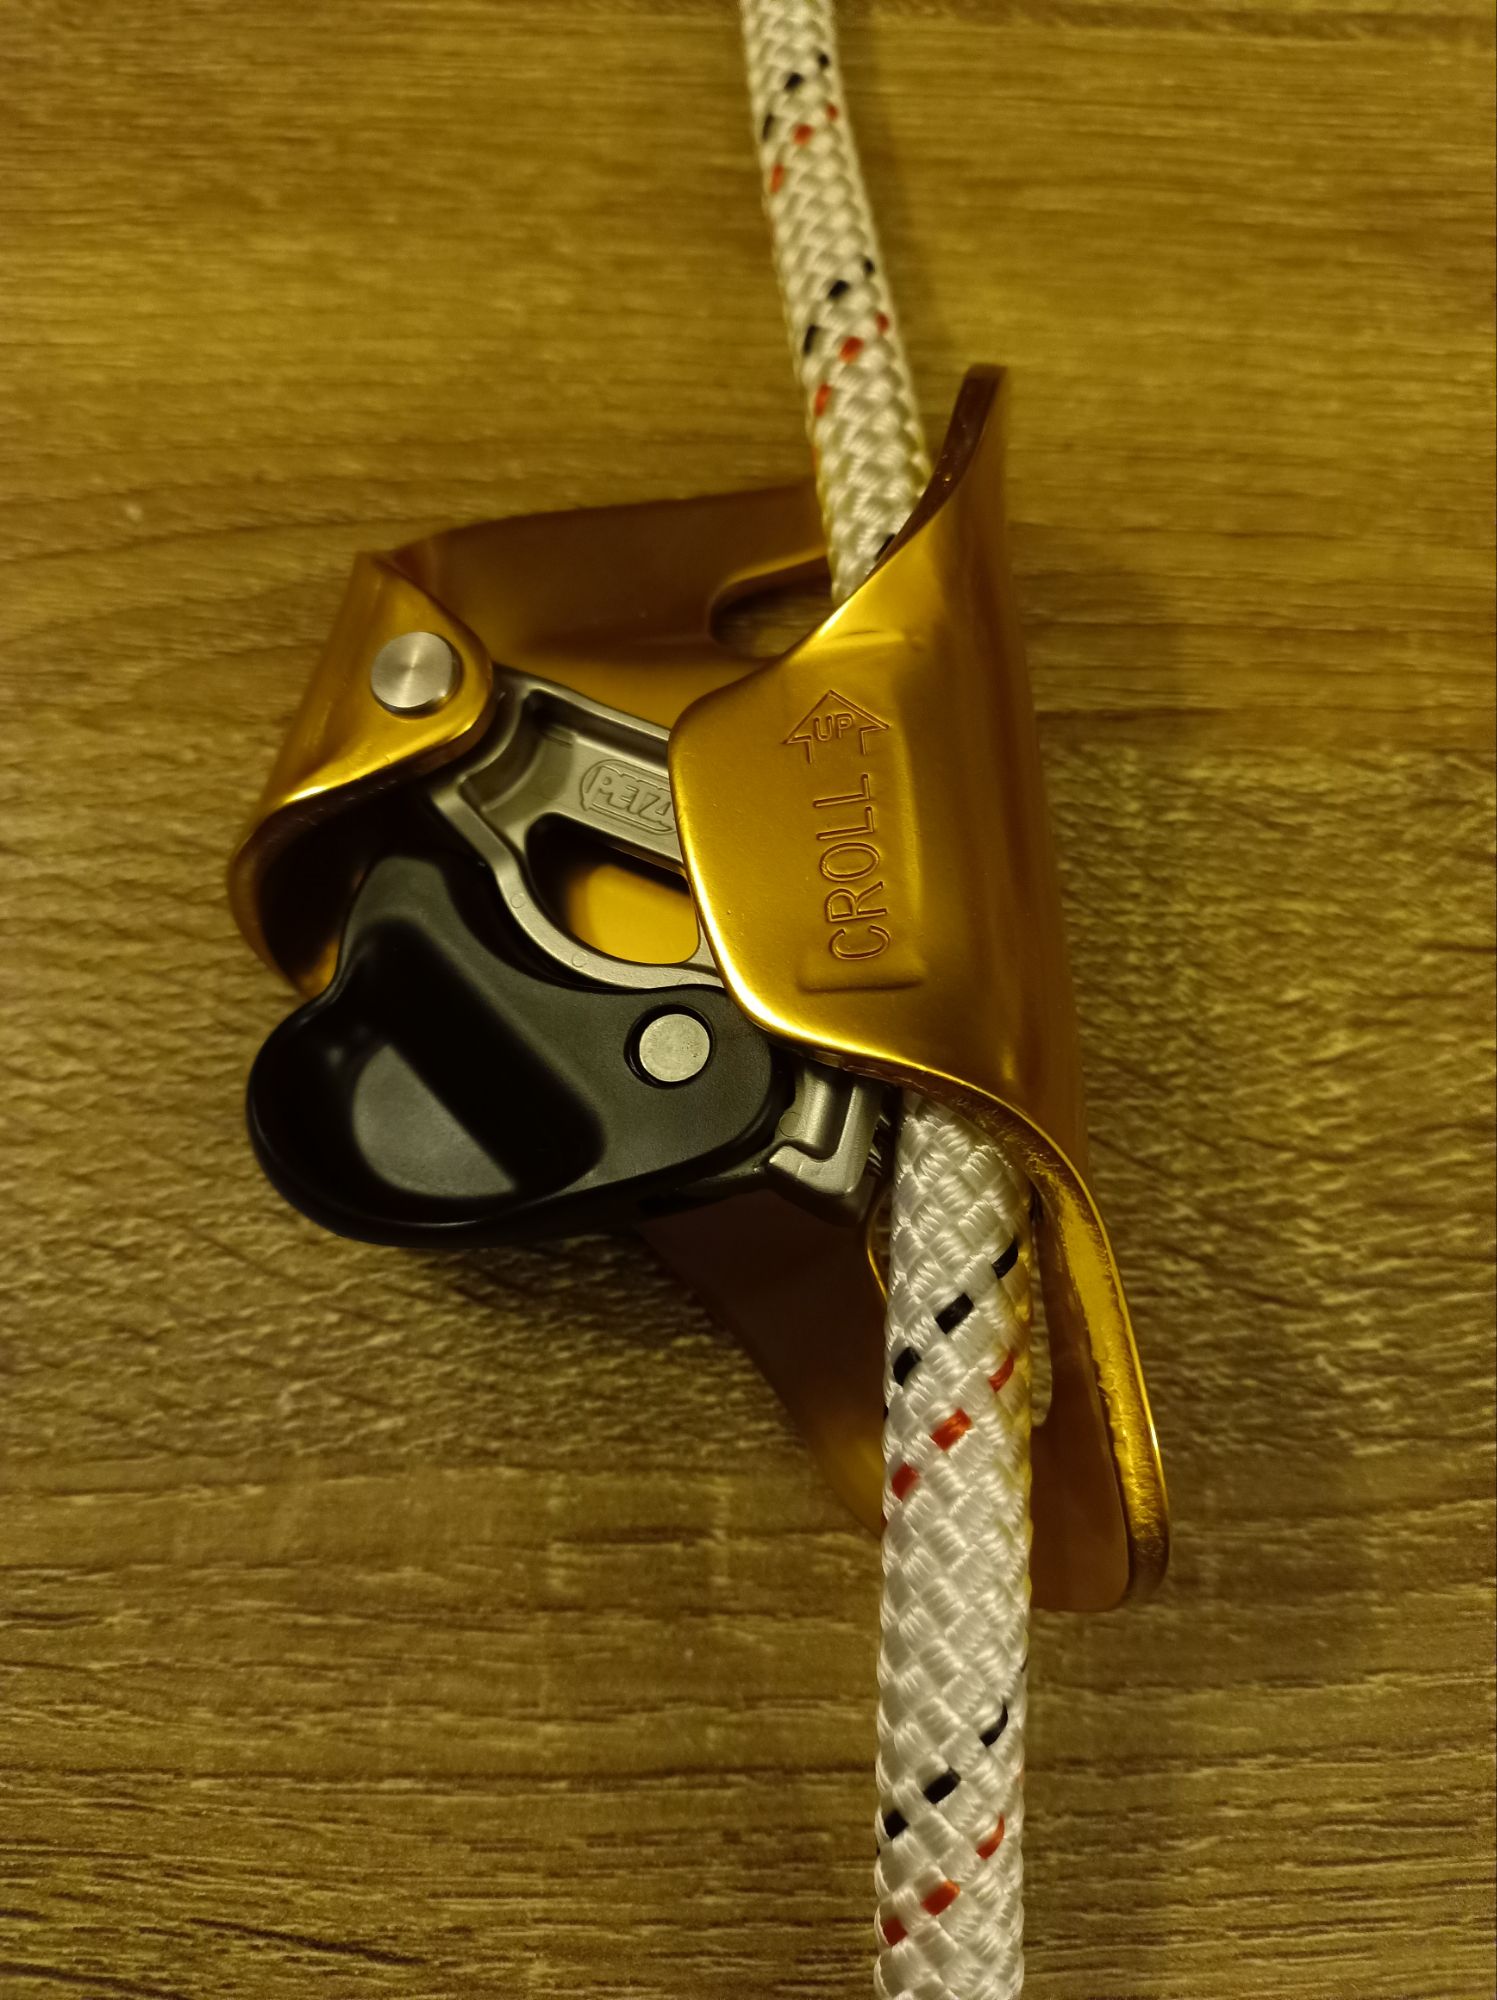
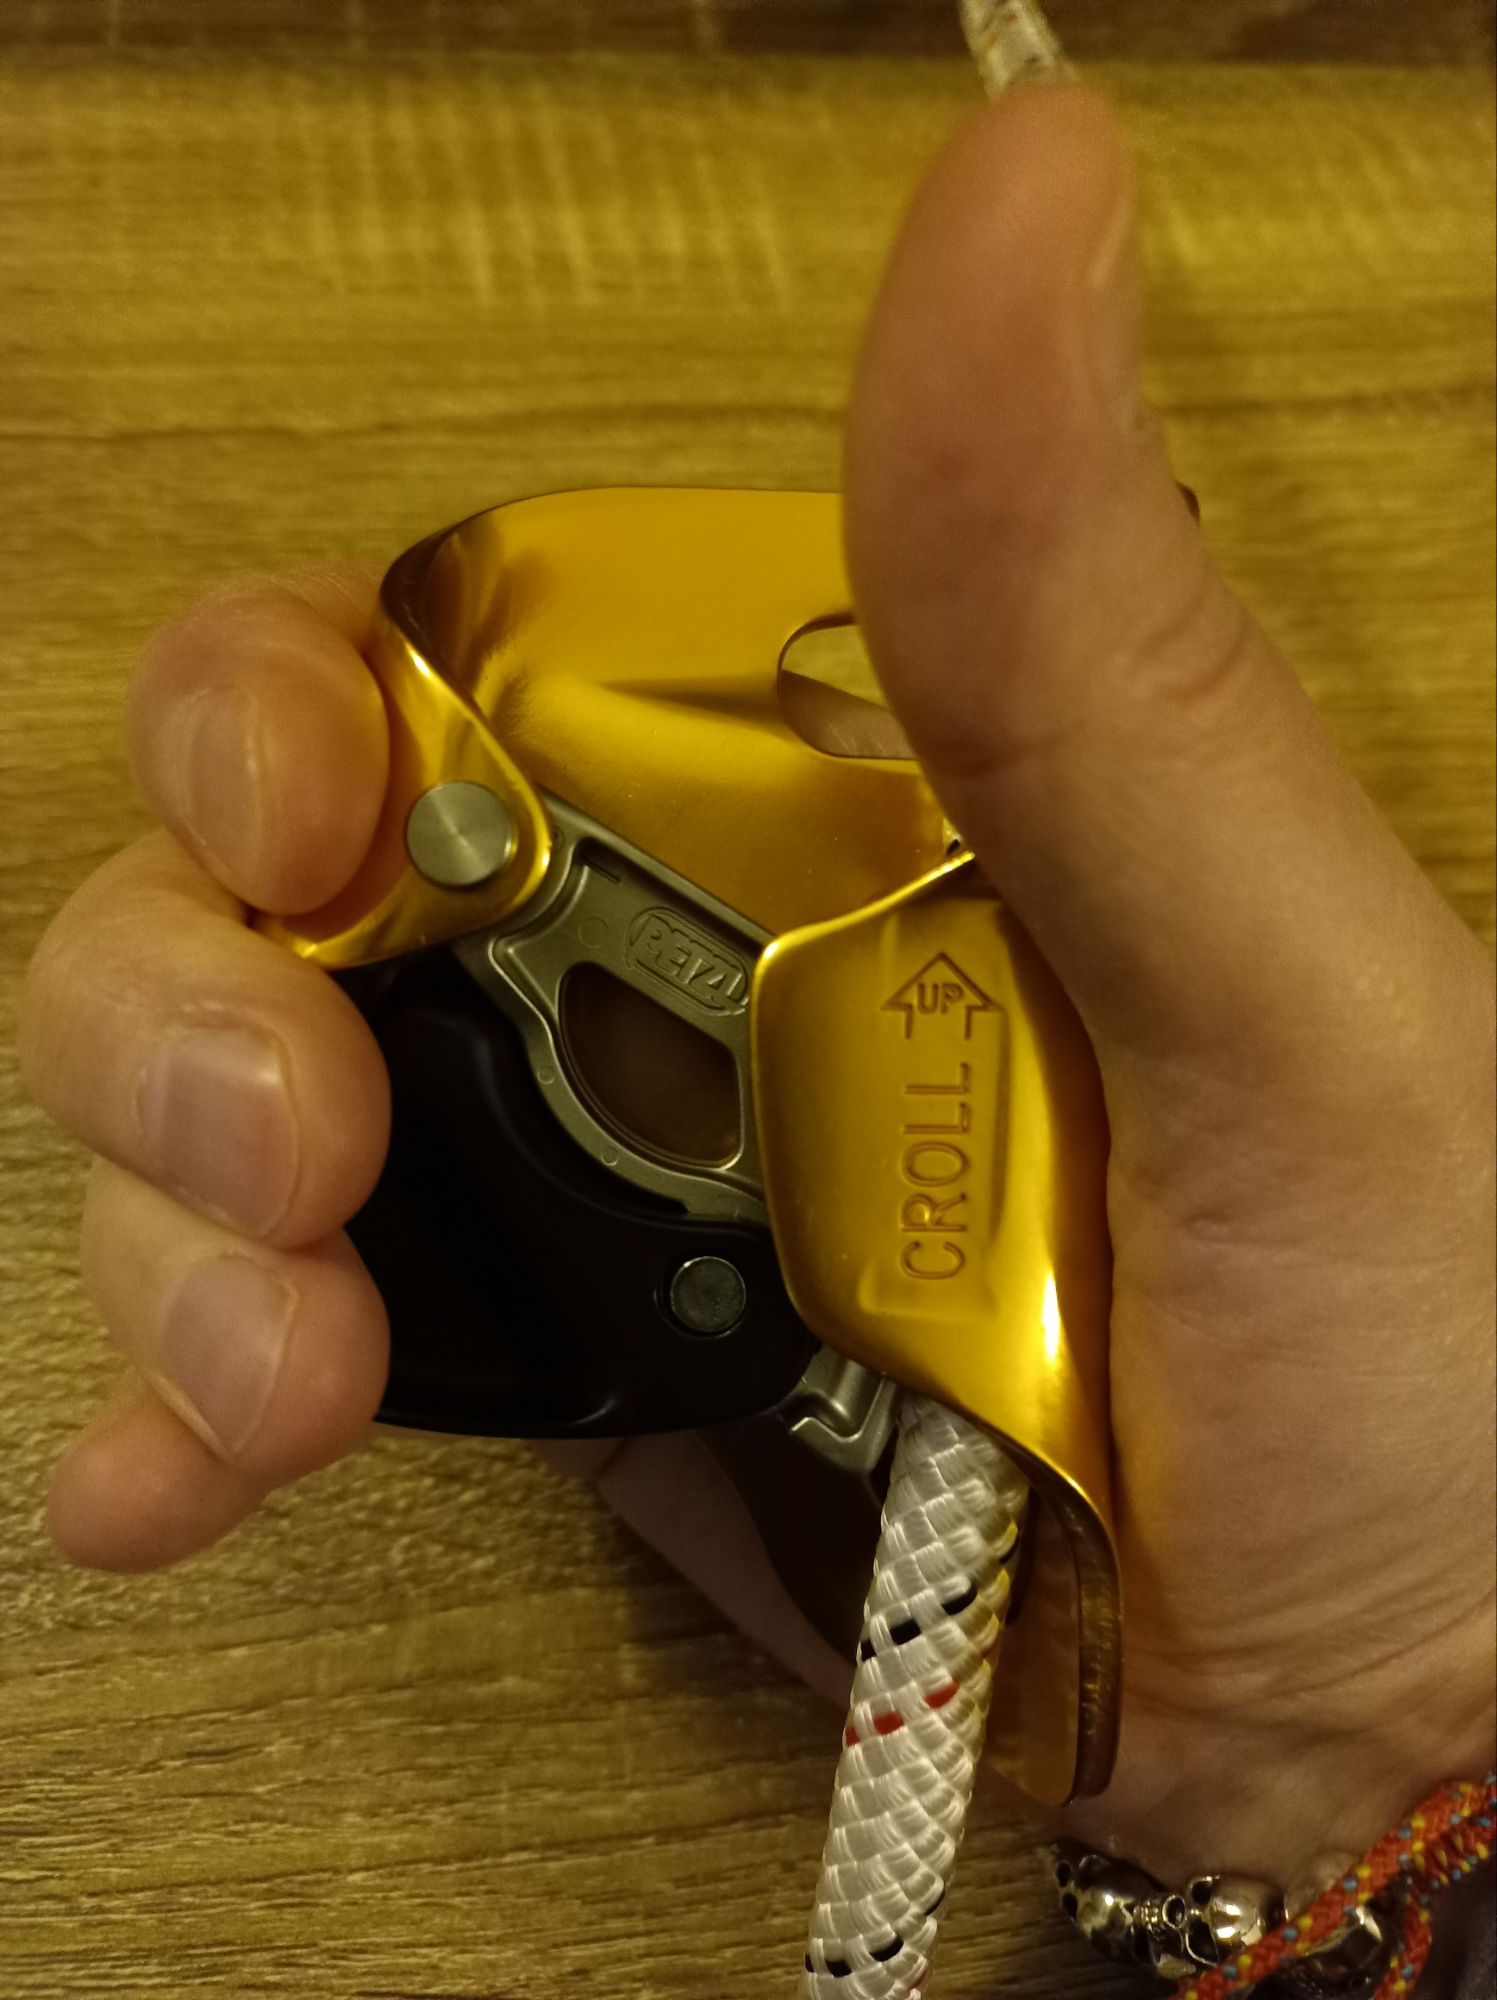
We are using chest ascenders at this point and ascenders are a simple mechanical devices which attach to the rope and you. They have a one way gate mechanism which is spring loaded which enables you to push the device up the rope, while the sharp metal teeth on in inside of the gate face downwards, meaning when you pull downwards on the device they grip the rope. This enables you ascend the rope by pushing up then pulling down, using the device as a sort of handle in fact some are designed exactly like this such as my Petzl Ascension (Picture below)


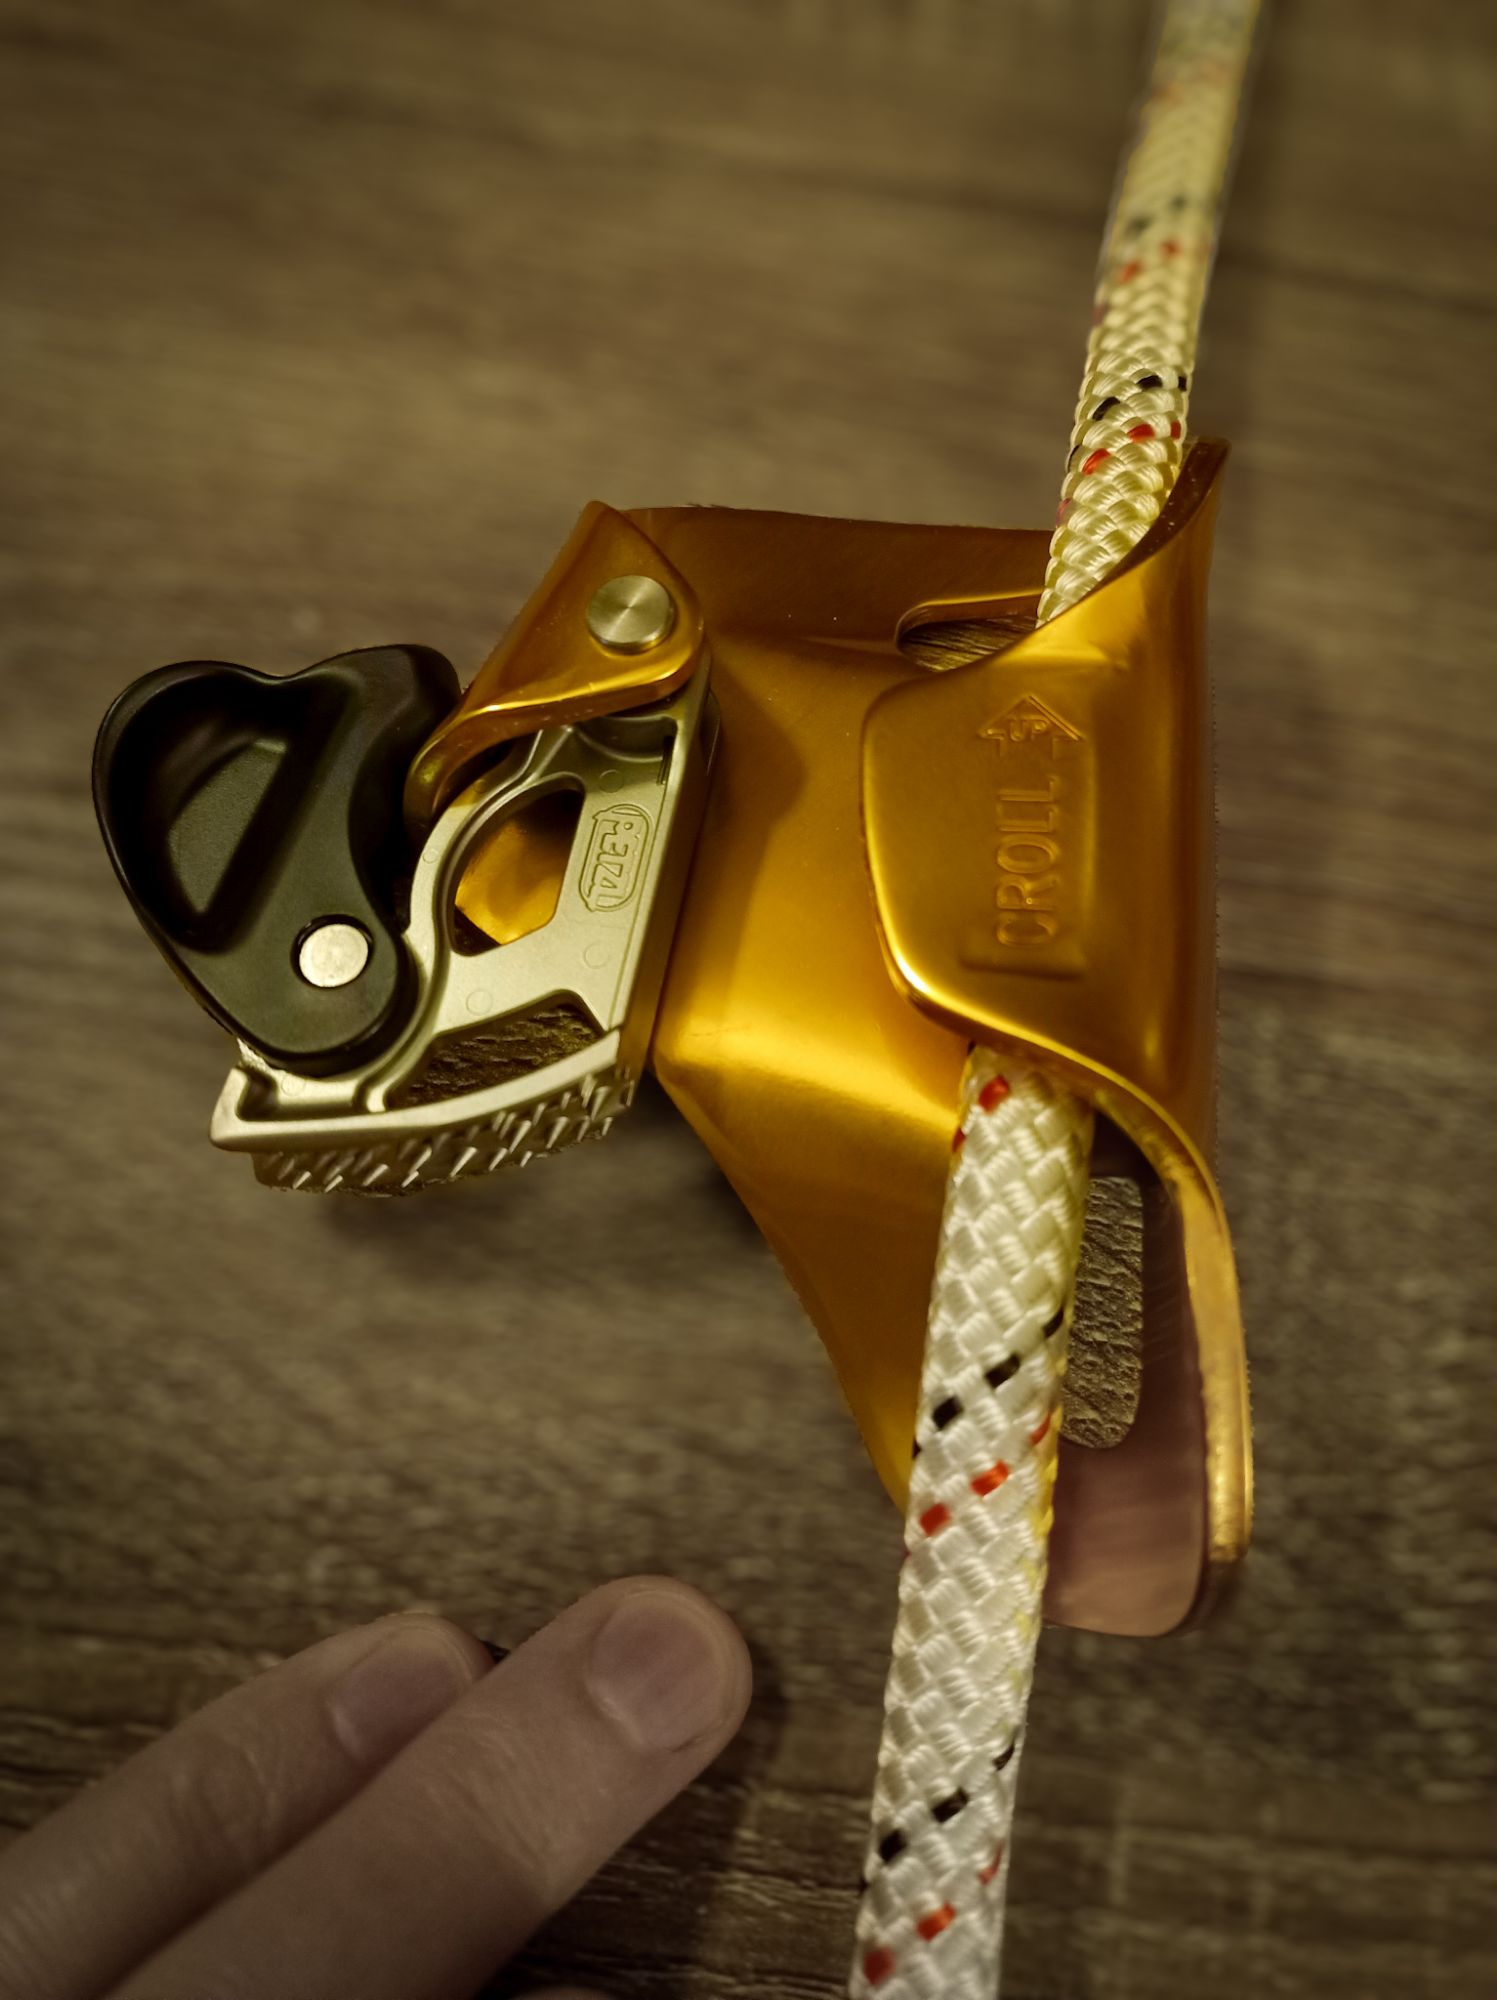
These devices are used in other activities also such as rope access, rescue situations, mountaineering and climbing. As mentioned we are using chest ascenders in this case Petzl Croll type devices such as mine pictured below which is a Croll L – favoured by cavers as it can take the bigger diameter ropes that are used. There are other versions and other brands of these out there too however. There are other ways of ascending ropes also which don’t involve mechanical devices.
The handy diagrams below from Petzl give you an idea how the device fits into the setup connecting the chest and waist harnesses.

As you may be able to see in the video I’m using my Petzl Ascension as well as the Croll Device. The ascension here has a foot loop attached to the bottom on the ascender, and this is attached to your waist harness. The foot loop you can get ready made however they can also they can be made by you essentially being two carabiners and a length of rope ) which is a nice cheap option, and as our instructor points out quite cheap to replace the parts of. There is a great book by Andy Sparrow which explains further the finer details of this. The action of uses these devices to climb the rope (or any hitch or device to climb a rope in fact) is known as prusiking named for the simple knot created by Dr Karl Prusik – the prusik itself is a type of friction hitch and the way it works, just like a mechanical ascender is that it can be loosened and pushed up a rope, yet when it is weighed the knot locks around the rope it is wrapped around. A prusik is usually made from climbing cord and the disadvantage of it is when weighted too much I can be hard to loosen again and allow yourself to move, and of course a friction hitch made of cord won’t be as durable as a mechanical ascender. It is however a very handy know to know in case any of your equipment breaks or you get into any other trouble.
The combination of foot loop and hand ascender as well as a chest ascender allows you to stand up in the foot loop on one or two legs and then move the hand ascender and chest ascender upwards allowing you to climb the rope.
What’s It Actually Like Doing This For The First Time?
I’ve seen plenty of videos of people climbing ropes using ascenders but it doesn’t really prepare you for attempting it yourself, and at the moment I’m smuggling more than a few pork pies. What it is in essence is using ascenders, which do what they say on the tin to lock onto the rope and shimmy up it, which I make sound far more elegant than I make it look in the video below. The hardest part is pulling your body in and keeping it close to the rope, which makes life a lot easier, this however does take some core strength in the first place. The part I struggle with is the standing up in the foot loop and as I’m still recovering from reactive arthritis in the right knee that leg I’d usually favour is pretty weak, and this does hurt a fair bit at the moment. Obviously having one slightly dodgy leg means on I haven’t been able to work out as much and I’ve ended up being a bit of a porker currently. To make the whole process even less graceful I am also at this stage starting to become a bit of a porker due to not being able to workout as much and I’ve got to carry my extra lard up this semi static (bouncy) rope. Imagine doing lots of pistol squats but…on a rope. I’ve got the other chap Hywel filming this going on partly fort the blog and also for me to look back on and memorise considering getting this right is going to have a big impact on whether or not I fall down a massive cavern underground never to be recovered again. Now part of me makes me think what all dudes probably do the first time they abseil or ascend, that I should look like a special forces dude doing this. Or if you were around between 1966 to 1984 (maybe a bit older at a push) or if you had a GI Joe toy you all know exactly what I mean and don’t pretend you don’t! Realistically though I look like a set of chubby love handles crotch thrusting an oversized piece of string. Movies make this shit look way more glamorous. Also I’ve got mega builders arse going on….but the good thing? Nobody is going to see how much of a jiggly sweaty mess I am currently when I’m underground.
These rock walls makes the training more realistic, though when I accidentally put a knee in to the rock wall as I clear the top of the pitch like a seal trying to flop up onto a rock, well that wakes me up a bit. And as usual I feel that familiar sense of relief when I get to the top. Unfortunately on this session I didn’t get any shots or videos of us traversing however I will update the blog soon with us doing that and explain how it works.
Did you enjoy this blog? Subscribe below for email updates every time we release a new article!
