

This has to be one of the most fun bush craft based little crafting sessions I’ve done, after finding some very large maritime pine cones, and thinking…they already look like a chunkier natural occurring version of something you can make for fire lighting, feather sticks. I decided to text my friend Bracken, who is a forest school and Bush craft tutor at Bracken Outdoors and ask the question you can already guess …do you think I could make a fire torch out of a huge pine cone? Of course the answer was ‘yes!’ because otherwise I wouldn’t be writing this blog. Though I know there’s no way this hasn’t been done before because it works well it’s a handy thing to be able to do and of course plenty of fun. We first did this in North Wales and enjoyed the caveman vibe so much I thought I’d share how to do it with my readers.
A Disclaimer
Personally I wouldn’t feel right if I didn’t put a disclaimer in here and though I’m sure I’m sure a lot of my readers are sensible and treat nature with respect and have lot’s of common sense however, you know that saying ‘common sense is like gold dust’? Well I would go as far as saying common sense in reality is as rare as unicorn poop. Maybe you think that’s a little harsh however 2,262 Hectares of land were burned in wildfires during 2024 – for perspective on that a football pitch is around 0.62 to 0.82 hectares. In some cases these fires happen in areas that have peat soil underfoot and this is also a fuel, and peat land makes up 30 percent of the UK national parks. Ferns are present in the majority of national parks and when dead and dried out fern leaves and stems are present a fire in this spreads rapidly. As you can see on Statista.com since 2009 wildfires have increased considerably in frequency. When we created our fire torches we developed them under the advice of a trained professional bush craft instructor, and every time we have a camp fire we prepare our area accordingly. Below I’ve written some considerations before you attempt anything in this blog, if unsure then don’t try any of this
Have You Checked You Are Allowed To Have A Fire?
Many places especially national parks will have a strict rule on NO CAMPFIRES and they have these rules usually displayed very clearly especially in Snowdonia where idiots ignore them. Some people may think having no campfires is to ruin their fun. If you are one of these people it’s actually to protect national parks and ecosystems – you know the very one you are going to go there to enjoy. It’s also because wildfires are devastating. Lot’s of fires are caused by people being ignorant of how fire is caused and spreads which is crazy considering you have a device in your pocket that has access to most of the information on the entire planet. We were able to have a camp fire because we were on private land on a dedicated wild camping site we paid to stay at.
If you take a look at websites such as this one for the Lake District it says quite clearly that camp fires are not allowed in the national park and there are similar rules for Eryi (Snowdonia)
Be mindful of the weather, if there’s been several weeks of hot sun where you are there is a danger of wildfire. You do not want to be the cause of one, or for that matter be caught in one. Not only is this devastating for wilderness areas you could be responsible for the injury or death of others. Also pay attention to the wind – this can carry embers from your fire to other areas and start more fires.
Manage Your Fire: If you are creating fire keep a way of putting out a small fire with you such as water – in case a fire begins to get out of hand. Clear the camp area if there’s a lot of flammable material around to reduce the risk of fire spreading. Be aware that burning loose material like dry ferns can cause plenty of embers, which as mentioned previously can cause smaller fires, and they can also burn lots of little holes in your clothes and your tent or tarp.
Don’t leave fires unattended: A pretty basic rule this, you can’t manage a fire you are not keeping an eye on. And fire torches left unattended can easily set things ablaze, so watch them also. If a fire’s no longer needed then make sure you put it out.
Leave no trace: As usual make sure you leave where you camped as if you were never there, take your junk home with you and put your fire out and cover it over. Dousing the fire with water will prevent it re igniting or embers going astray.
Why These Work
- Pine resin:- Pine trees themselves are full of pine resin, a sticky sap which is highly flammable and even burns when it’s slightly damp. Being very sticky it has a number of other uses such as being able to be turned into a glue. Pine resin is flammable because contains terpenes which are also what give the pine resin it’s nice refreshing smell.
- Pine Cone Structure: When the weather is warm and dry pine cones open to release their seeds. This creates more surface area and increases air flow between the scales. The wood they are made of is fairly hard and dense and the gaps between the scales can be stuffed with tinder and pine resin fairly easily which is what we are going to do here. In this case In this case we are using maritime pine cones, they are huge things and they work perfectly for this. It’s worth noting that pine cones close up when the weather is damp, so this wont work in damp or humid weather. They make a great basic way to measure air humidity however.
- Birch Bark: This stuff is also great for starting fires and will get your torch going well. Birch bark is flammable as it contains a chemical called Betulin which is highly flammable and also water resistant.
- Greenwood torch handle: Greenwood being freshly cut and not seasoned is full of sap and for this reason it is quite fire resistant, making it useful as a torch handle because it wont burn away easily when you light your pine cone.
What Will You Need
- Common sense – seriously don’t set yourself or the forest / area on fire
- About one metre or more of greenwood (freshly cut) about 3 to 4 cm diameter
- A bush craft knife
- Pine resin – think at least a golf ball sized amount
- Two sturdy sticks about 40cm long and about 2.5 to 3cm diameter
- A handful of birch bark
- Optional: Organic Rags like cotton
- A heavy stick about 6cm across and about 30cm
Step One: Get yourself a good length of greenwood about a metre or longer, ideally as straight as possible.
Step Two: Carefully using a bushcraft knife split the end of this piece of wood in four sections, about 30cm down the wood – this will make our torch grip. Use the heavy stick to gently tap the top of your bushcraft knife through the stick, keeping your other hand safely out of the way. See pictures below to illustrate this. In this case I’m using a lovely razor sharp Morakniv Kansbol for the splitting


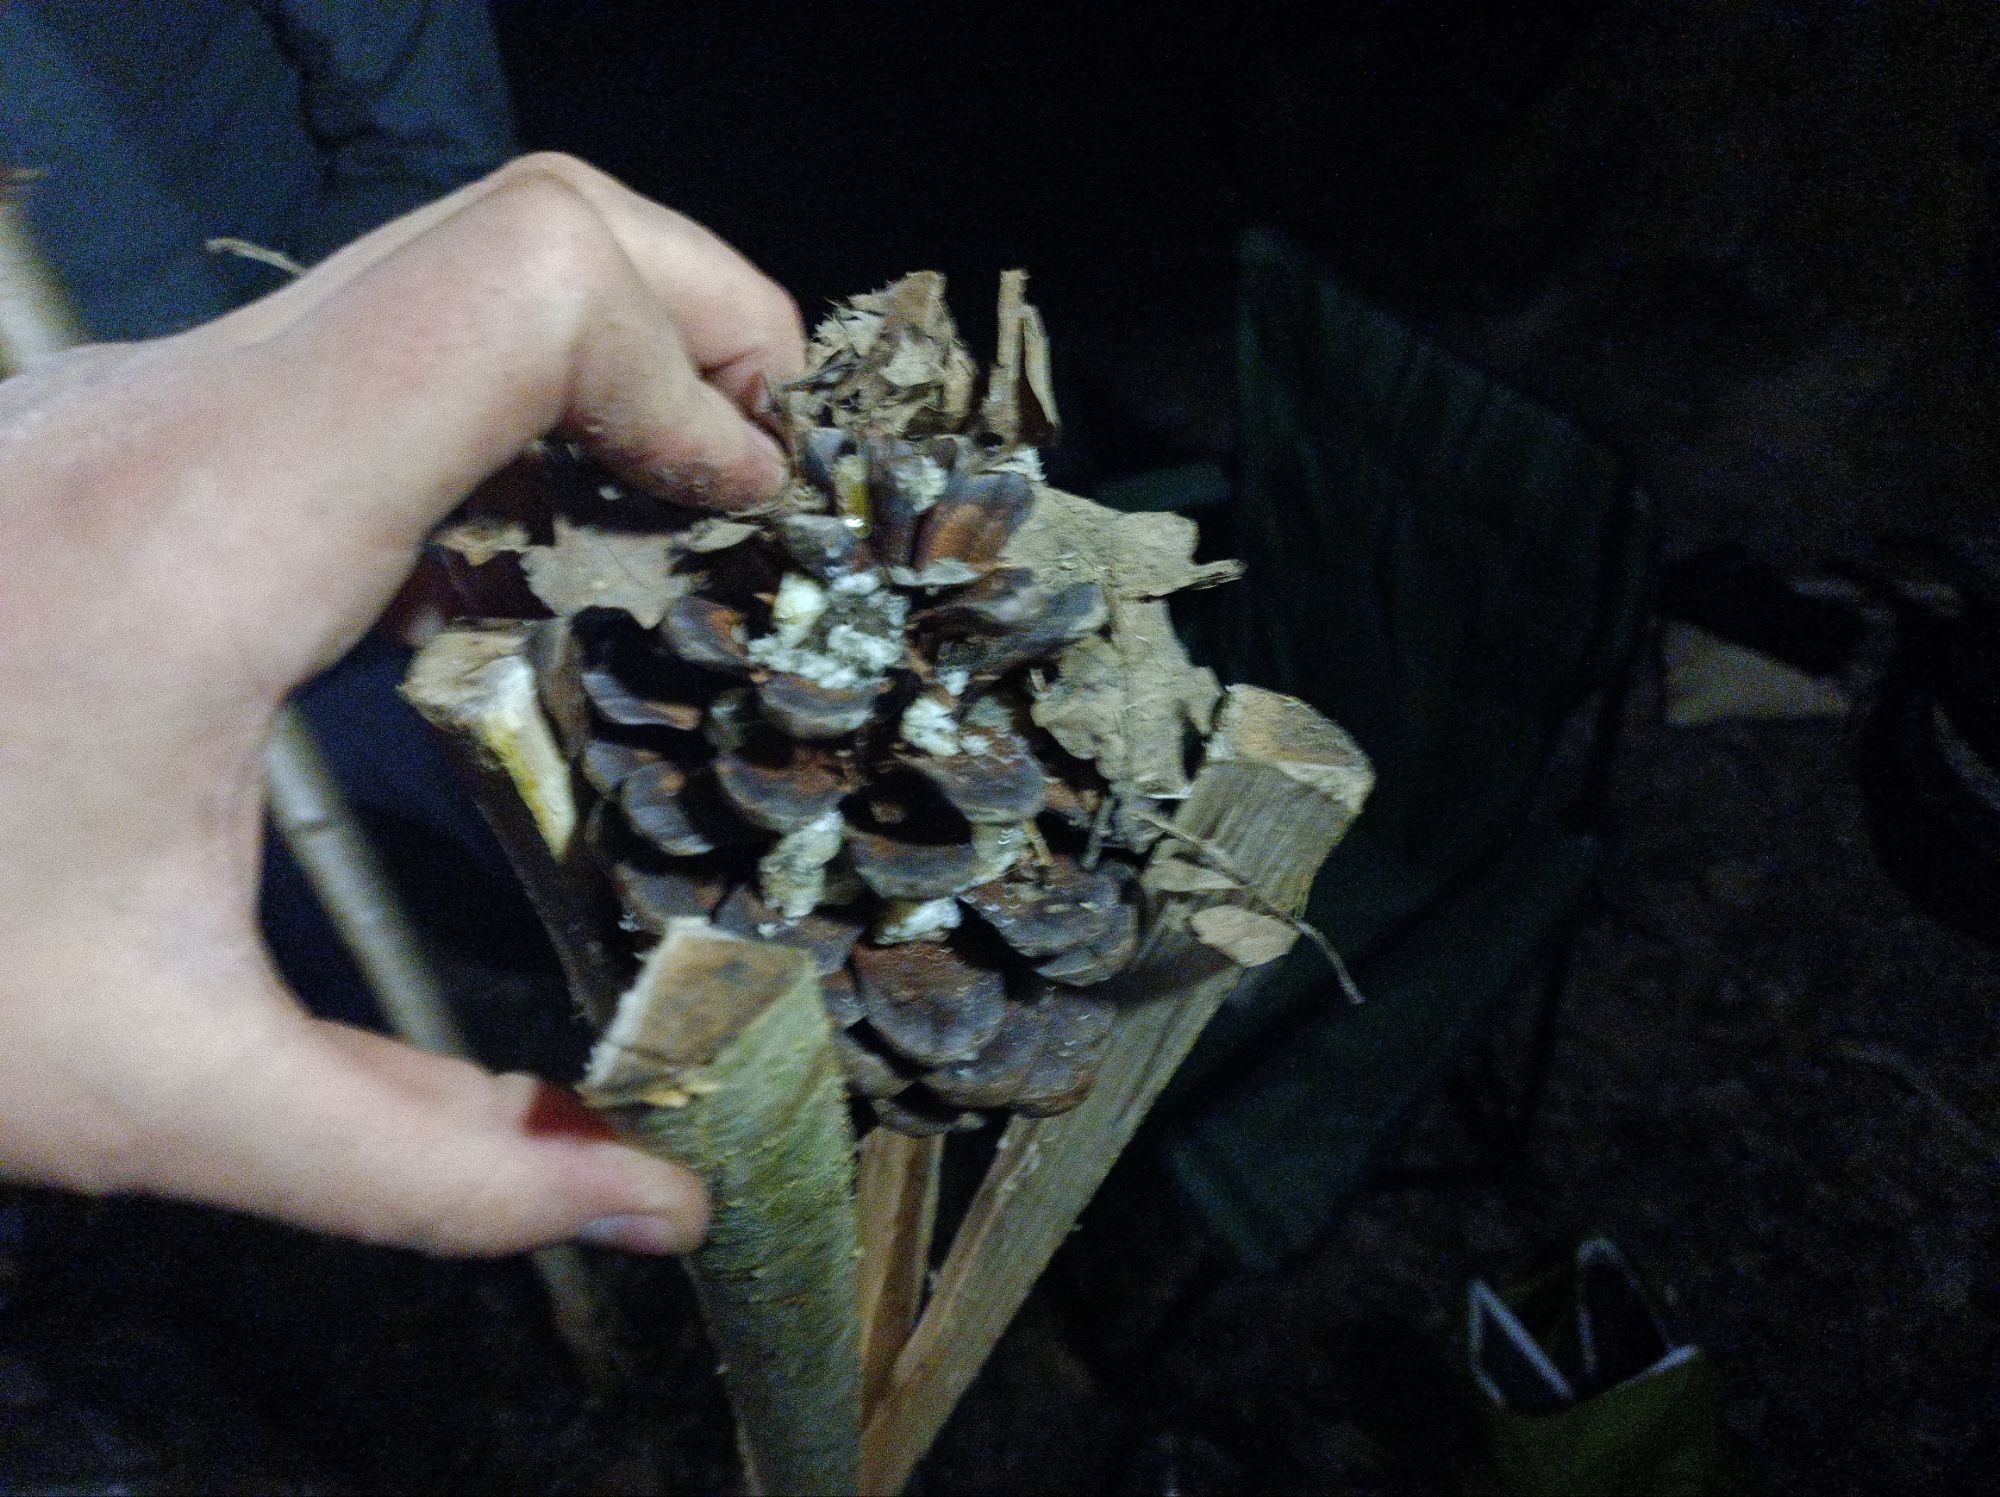
Step 3: Find yourself two thin but sturdy sticks to use to push the sides of the torch grip apart until you have space to put the pine cone in. Then wedge your pinecone in there as straight as you can with the fat end down until the sides of your fire torch handle grip com up it about half way.


Step 4: Stuff your pinecone with lots of pine resin as deep as you can, use it’s stickyness to wedge tinder in there also, but make sure you still leave lots of space for air flow. Here we just used birch bark to get the torch going.

Step 5: Put your sticks out that are holding the sides of your torch stick apart, this should now hold your pine cone tightly.
Step 6: Get it burning: if you have a fire going already just hold your pine cone end in the fire and slowly turn it to get the torch going evenly. When hot the pine sap will liquify and it does run trust me if it gets on bare skin it really hurts. The addition of rags or other absorbent materials can help here to keep the torch burning longer and the resin in check! Gloves are a wise idea and holding the torch at a 45 degree angle when lit. If you want to stick the torch in the ground to illuminate camp the best idea is pre prepare some post holes, you can do these with a stick the same diameter as your fire torch holder stick and bang it into the floor about 50cm with the flat back of an axe.


That’s it, enjoy and don’t set yourself on fire. That’s not fun. If you enjoyed this blog, please like and subscribe to our mailing list below for free hiking routes, adventure tips and more!
Finally massive thanks to Bracken at Bracken Outdoors for providing excellent advice as always – if you want to learn more skills like this please check out his website.
